Friday 30 October 2009

Ironcupcake Earth - Voting Now Open

Ironcupcake Earth Voting is now open until 5th November - vote for me (icing bliss) or for the other amazing entries at No One Puts Cupcake in a Corner.


Thanks for your support!!

Thursday 29 October 2009

Cupcake Cookie Jar


I recently received this cupcake cookie jar and just had to post a pic. It is so adorable. I absolutely love it! It's oversized (23 x 26cm) so can be used to store other things like fruit, or just simply placed on a table as a gorgeous centrepiece. If you want one too you can buy it online at Debenhams.

Thursday 22 October 2009

Iron Cupcake Earth

The first challenge of the year for Iron Cupcake Earth is music. I had a lot of fun trying to come up with song titles that I could bake as a cupcake....not an easy task.......but luckily I had some great suggestions from friends to help me! In the end I decided to make 'Raspberry Beret' cupcakes....rasberry and white chocolate cheese cake topped with white chocolate cream cheese frosting and a rasberry sugarpaste beret.


Voting will be held from 30th October - noon on the 5th November at http://www.ironcupcakemilwaukee.com/. Be sure to stop by at the website and check out all of the great entries and vote for your favourites!

We're all competing to win some fantastic prizes, including:
The Demy™ by Key Ingredient
Hello, Cupcake by Karen Tack & Alan Richardson
Bella Cupcake Couture
Cupcake Stackers by Gourmac
The Cake Mix Doctor Returns! by Anne Byrne

If you want to recreate these cupcakes, here's the recipe:

Cupcakes
  • 1 1/2 cups of white sugar
  • 750g light cream cheese
  • 1 tsp vanilla essence
  • 4 medium eggs
  • 500g raspberries (thawed if using frozen berries)
  • 120g organic white chocolate (chopped into small pieces)

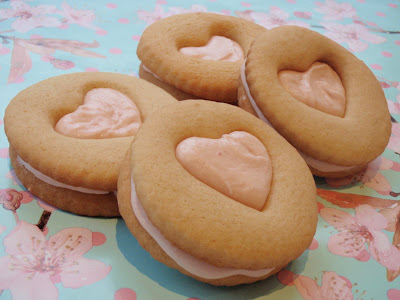
Cream Cheese Frosting

  • 250g light cream cheese
  • 80g organic white chocolate
  • 1 tsp vanilla essence
  • 100g sifted icing sugar
  • 70g unsalted butter (softened)

Preheat the oven to 175C. Blend sugar, cream cheese and vanilla essence in a bowl with an electric mixer until smooth. Add the eggs, one at a time, ensuring that you mix them in well after each addition. Fill ~18 holes in a lined cupcake tray about 3/4 full with the cake mixture. Divide the chopped white chocolate pieces and the rasberries evenly between the 18 cupcakes and gently push them into the mixture. Bake cupcakes for about 25 minutes, then turn the heat up to 230C and bake for a final 5 minutes. Remove cupcakes from the oven and let them cool for a while before putting them in the fridge and letting them set for at least an hour.

In the meantime, prepare the cream cheese frosting by mixing butter, vanilla essence and cream cheese with an electric beater until smooth. Gradually add icing sugar, mixing well. Stir in melted white chocolate, then refrigerate frosting until it is needed.

Once the cupcakes are cool, pipe the frosting onto the cupcakes. Store them in an airtight container in the fridge. These cupcakes are so delicious and are also gluten free.

Happy baking x

Wednesday 21 October 2009

Spooky Cupcakes

As a kick-start to Halloween, I made a batch of cupcakes today after getting inspiration from Martha Stewart's Halloween page. There are heaps of great ideas on her website but I couldn't resist making some ghost cupcakes. Here's a quick demonstration on how I put them together:

1. Make a batch of mini cupcakes (I made chocolate ones) and cover with an icing of your choice

2. Stick 2 marshmallows together with icing and then place on top of cupcake


3. Drape thinly-rolled white sugarpaste over the top of the cupcake


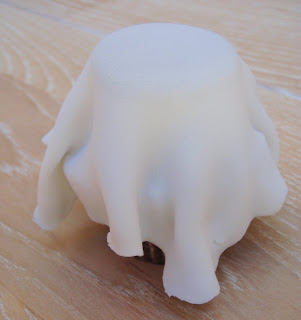
4. Add eyes and a mouth (I used sugarpaste and chocolate sprinkles) or any other features you want to include


5. Enjoy your cupcakes!
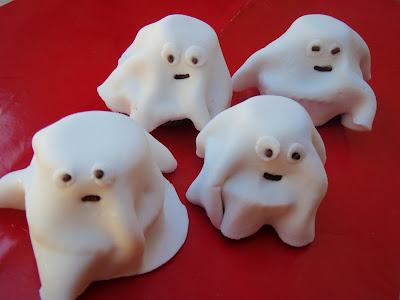
Happy Halloween!

Thursday 15 October 2009

Winner!

The winner of the National Cookie Network Baking Challenge for September has just been posted and I am so thrilled to announce that my mascarpone cookies filled with strawberry ganache won. There were so many amazing entries this month for the 'strawberry' theme. The other bakers have all shared their recipes so I'm going to have lots of fun trying them out over the next few weeks.


Stay tuned for my entry for the October cookie challenge. I'll be posting it on the 1st of November!

Friday 9 October 2009

Marzipan Figures

On Monday, I created a small Japanese scene using marzipan. This is the first time I've used marzipan for modelling, and I have to admit, I think it might be my new favourite medium. Marizpan, which is made from finely ground almonds, can be stuck to itself without edible glue or any other agent. It can also be easily coloured with foodgrade coloured pastes, making it a highly versatile product for creating figures as cake toppers.

Here's a quick tutorial on how I made Japanese geisha dolls using Renshaw marzipan:

1. Stick a flesh coloured ball for the head onto a pear shaped body.

2. Add an inverted triangle onto the front of the body (v-neck of kimono) and 2 triangles of marizpan on either side of the v-neck, as lapels.

3. Make a patterned sash for the kimono. as an example, I rolled black flowers into red maripan.


4. Wrap the sash around the waist of the body, then create a bow at the back to cover the join.

5. Add the arms, by creating two crescents and wrapping them around the side of the body to the front.

6. Create little hands using flesh coloured marzipan

7. Add the hair by creating a black circle of marizpan and draping it over the head. Cut to size and add a fringe and texture using a dresden tool

8. Add a top knot and ribbons, bows, flowers etc as decoration if desired


9. Add features to the face, such as eyes, nose and mouth to complete the doll.


I created 2 dolls and a little table of sushi to complete the scene.


Have fun with marzipan!

Ironcupcake UK - October Challenge

On Monday I entered the 5th round of Ironcupcake UK. This month, the theme was "alcohol" and there were 19 entries from 14 bakers. There were so many great cupcakes this month, it was really tough choosing a favourite! I made a batch of mojito cupcakes, and ended up coming 2nd which was such a thrill. Here's my recipe for anyone who wants to try it out for themselves:

Mojito Cupcakes

Ingredients

Cupcakes (makes ~20 cupcakes)

  • 1 cup buttermilk
  • 1 tbsp. dark rum
  • 1/2 tsp. vanilla extract
  • 3 cups plain flour
  • 1 tsp. baking powder
  • 1/2 tsp. baking soda
  • Pinch of salt
  • 225g unsalted butter (room temp)
  • 2 cups caster sugar
  • 4 medium eggs

Rum Syrup

  • 1 cup caster sugar
  • 1/4 cup cold water
  • 55g unsalted butter
  • 1/4 cup dark rum
  • Zest and juice from 1/2 a lime
  • 1/2 cup fresh mint

Lime and Rum Buttercream

  • Zest from 3 limes
  • Juice from 1 lime
  • 250g unsalted butter (softened)
  • 600g sifted icing sugar
  • 1/4 cup dark rum

To make the cupcakes, preheat the oven to 175C. Combine butter and caster sugar in a bowl and mix on a medium-high setting with electric beaters until light and fluffy (about 5 mins). Reduce the mixer speed and add the eggs, one at a time, remembering to scrape the sides of the bowl after each addition.

In a separate bowl, sift in flour, baking powder, baking soda and salt and set aside. Combine buttermilk, rum and vanilla extract in another bowl and also set aside.

Using the mixer on a low speed, add 1/3 of the dry ingredients and mix well. Next add half of the buttermilk mixture and mix well (about 2 mins). Add another third of the dry ingredients (on low speed) and mix well before adding the remainder of the buttermilk mixture and mixing. Add the remainder of the dry ingredients (on low speed) and mix for a few minutes, until the batter is smooth. Scrape down the sides of the bowl to ensure that all of the flour has been mixed in well.

Fill a 12-hole muffin/cupcake pan, lined with paper cases, with the batter and bake for approximately 20 mins. Before removing the cupcakes from the oven, test that they are cooked all the way through by inserting a skewer into the centre of the cupcakes. If it comes out clean, they’re done. If not, bake for another 5 mins. Remove the cupcakes from the oven and let them cool for a few minutes before poking holes in them with a skewer or toothpick. Immediately spoon the rum syrup over the warm cupcakes and let them soak it all up. Once they’ve cooled completely, you can ice them with the lime and rum buttercream.

To make the rum syrup, put butter, caster sugar and water in a saucepan and bring the mixture to a boil, stirring often. Once the butter has completely melted and the sugar has dissolved, remove from the heat. Carefully add the rum. The mixture will bubble so take care not to burn yourself. Once you’ve mixed in all the rum, add the lime zest and mint and let the syrup infuse for 5 minutes before spooning over the cupcakes.

For the lime and rum buttercream, beat sugar on high speed for about 5 mins until light and fluffy before gradually adding sifted icing sugar (about 200g at a time) on a low speed. Once all the icing sugar is incorporated into the mixture, increase the mixer speed to high again and mix for another 2-3mins. The buttercream should be light and fluffy. Turn off the mixer and scrape down the sides of the bowl. Add the rum and the lime zest and mix on a medium speed until well incorporated. If you wish to colour your buttercream, you can also add a few drops of green food colouring to make it a lime colour. Add buttercream onto cupcakes once they are completely cool and the rum syrup has been soaked in. You can spread the buttercream on with a knife, or you can use a piping bag to pipe a swirly design.

For my cupcakes, I made lime pieces from green sugar paste to add as decoration. Here's the final result:

More pictures from the competition are on the ironcupcake website.


Next month, the theme is 'spice'. If anyone has any suggestions on spices I should try, I'd be happy to hear from you :)

Happy Baking!

Thursday 1 October 2009

National Cookie Challenge - September Entry

Today I entered the National Cookie Network Baking Challenge, an online international cookie competition, where each month, competitors have to make a cookie based on a "secret ingredient", then post their recipe and a photo of their entry onto the national cookie network forum for judging. This month, the secret ingredient was "Strawberry". I had a lot of fun coming up with ideas for cookies, but settled on the following recipe as my entry:

Mascarpone Cookies Filled With Strawberry Ganache

Cookies
115g butter (softened)
1 cup caster sugar
1 tsp. baking powder
1/2 tsp. almond extract
1/2 tsp. vanilla extract
1/2 tsp. ground nutmeg
1/4 tsp. baking soda
Dash salt
1/2 cup mascarpone cheese (room temp)
1 egg
2 & 1/2 cups all-purpose flour

Filling
1 cup fresh strawberries
2 tsp. caster sugar
120g white chocolate

Preheat oven to 175C. Beat butter with an electric mixer on medium speed for 1 min in a large mixing bowl. Gradually add caster sugar, baking powder, nutmeg, baking soda and a salt. Continue beating the mixture until it is combined, scraping the side of bowl occasionally. Mix in mascarpone cheese, vanilla and almond extracts, and egg. Then beat in as much of the flour as you can with the mixer. Once it is too thick to use the beaters, use a wooden spoon to stir in any remaining flour. Wrap the dough in plastic and refrigerate for at least an hour or until dough is easy to handle.

On a lightly floured surface, roll out the dough and use cookie cutters (I used 3-inch fluted circles) to cut out the dough. Use a smaller cutter (I used a small heart) to cut out the centre of half of the cookies. Place cookies on a line baking tray and bake until edges start to brown (5-7mins depending on oven). Transfer cookies to a wire rack to cool.

Puree the strawberries and mix in the caster sugar. Strain the puree through a sieve to remove seeds. Melt chocolate in a bowl over a pot of simmering water, stirring continuously to prevent the chocolate from burning. Remove the chocolate from the heat and stir in the strawberry puree. Cover with plastic wrap and cool to room temperature.

To assemble the cookies, spread the flat side of each whole cookie with a teaspoon of the ganache. Top with a cutout cookie, and dust with icing sugar if desired. Cookies store well in an airtight container at room temperature for up to a week.


Happy Baking x